
„Linux“: Įdiekite ir nustatykite „Wine“
Jei norite naudoti „Windows“ programinę įrangą su „Linux“, dažnai naudojate „Wine“. Mes jums parodysime, kaip įdiegti ir nustatyti programą.
Įdiekite vyną - štai kaip
- Norėdami įdiegti „Wine“ savo „Linux“ kompiuteryje, viskas, ką jums reikia padaryti, tai į terminalą įveskite šią komandą: „sudo apt-get install wine“. Jei naudojate „Ubuntu 16.04“ ar naujesnę versiją, įveskite „sudo apt-get install wine-stabil“.
Paruoškite vyną - štai kaip jis padarytas
Norėdami sukonfigūruoti vyną, terminale įveskite „winecfg“. Dabar atidaromas langas, kuriame galite atlikti kai kuriuos nustatymus.
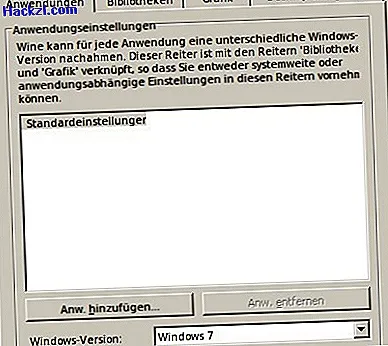
- Skirtuke „Programos“ galite nurodyti, kurią „Windows“ versiją mėgdžioti „Wine“. Kuris čia yra geriausias, negali būti apibendrintas ir priklauso nuo jūsų programų. Taip pat galite nustatyti atskirų programų parametrus.
- Skirtuke „Diskai“ galite nurodyti diskus, kuriuose turėtų veikti „Wine“. Pagal numatytuosius nustatymus čia įrašomi visi diegimo metu atpažinti diskai.
- Skirtuke „Grafika“ galite nurodyti, kiek didelis darbalaukis turėtų būti viso ekrano režimu. Čia taip pat galite reguliuoti ekrano skiriamąją gebą. Tai gali būti reikalinga, jei šrifto dydis netinka programoms.
- Taškas »audio« paprastai gerai veikia su standartiniais nustatymais.
- „Wine AppDB“ galite sužinoti, kurie parametrai tinkamiausi tam tikroms programoms.
Atidarykite „Windows“ programas „Wine“ - štai kaip
Norėdami atidaryti programas su „Wine“, terminale turite įvesti: „vyno pradžia / Unix“, po kurio nurodomas absoliutus failo kelias po kabučių.
Kitame praktiniame patarime sužinosite, kaip galite naudoti „Photoshop“ Ubuntu.