
„Windows Mail“: rūšiuokite ir tvarkykite paskyras - kaip tai veikia
Naudodami „Windows Mail“ visada žiūrite savo el. Pašto adresus. Norėdami gauti geresnę apžvalgą, turėtumėte rūšiuoti ir tvarkyti paskyras. Šis praktinis patarimas parodo, kaip tai padaryti.
„Windows 10“ programa, skirta „Windows 10“: kaip rūšiuoti paskyras
Naujausi vaizdo įrašai
Nuorodų gautieji (1)

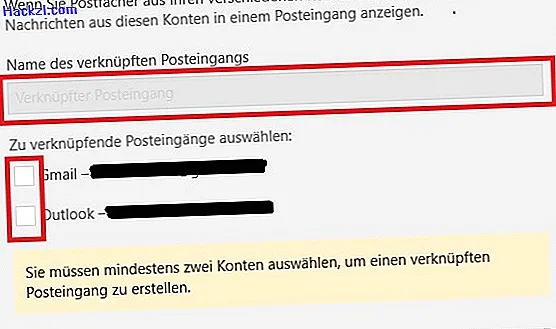
Nuorodų gautieji (2)
Jei „Windows“ pašto programoje naudojate daugiau nei vieną el. Pašto adresą, šiame straipsnyje jums parodysime, kaip galite susitvarkyti ir suskirstyti savo paskyras taip, kaip norite.
- Pirmiausia sukurkite susietą gautųjų aplanką. Norėdami tai padaryti, atlikite šiuos veiksmus: „Nustatymai“> „Tvarkyti paskyras“> „Susieti gautuosius“ (1 ekrano kopija).
- Dabar atidaromas naujas langas (2 ekrano kopija). Čia pasirenkate visus el. Pašto adresus ir patvirtinate mygtuku „Išsaugoti“. Sugeneruojamas gautųjų aplankas, kuris susieja visas el. Pašto paskyras.
- Dabar grįžtate į „Tvarkyti paskyras“ rodinį (1 ekrano kopija). Dabar pasirinkite pirmąjį mygtuką „Susieti gautieji“.
- Tada panaikinkite visų paskyrų žymėjimą viena po kitos norima tvarka, išskyrus paskyrą, kurią norite parodyti vėliau. Jei liko tik viena paskyra, susietos gautos žinutės automatiškai pasikeičia į likusią individualią sąskaitą.
- Tada gali tekti iš naujo paleisti „Windows Mail“, kad būtų pritaikyti visi pakeitimai.