
Pakeiskite pelės žymeklį sistemoje „Windows 7“ - štai kaip
Perskaitykite šį praktinį patarimą, kaip pakeisti pelės žymeklį „Windows 7“.
„Windows 7“ vizualiai pakeiskite pelės žymeklį
- Spustelėkite piktogramą „Pradėti“ arba „Windows“, tada - „Valdymo skydas“.
- Dabar pasirinkite kategoriją „Aparatūra ir garsai“.
- Dalyje „Įrenginiai ir spausdintuvai“ spustelėkite „Pelė“, kad atidarytumėte pelės nustatymus.
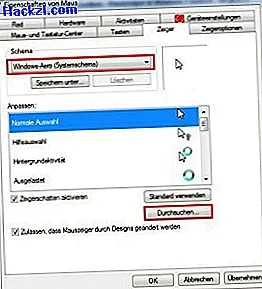
- Atidaromas langas pavadinimu „Pelės ypatybės“. Eikite į aukščiau esantį skirtuką „Rodyklės“.
- „Schemoje“ galite iš esmės pakeisti pelės žymeklio išvaizdą. Pavyzdžiui, pelės žymiklį galima padidinti, pavyzdžiui, pasirinkus schemą „Windows Aero (didelis) (sistemos schema)“.
- „Tinkinti:“ slinkties meniu galite pakeisti kiekvienos komandos pelės žymiklį. Norėdami tai padaryti, pirmiausia spustelėkite komandą, tada - "Naršyti ..." ir pasirinkite norimą žymeklį spustelėdami "Gerai".
- Išsaugokite pakeitimus spustelėdami „Taikyti“.
- Spustelėkite „Naudoti numatytąjį“, atkurkite visus pradinių nustatymų pakeitimus.
„CursorFX“ pelės žymiklį suteikia dar daugiau
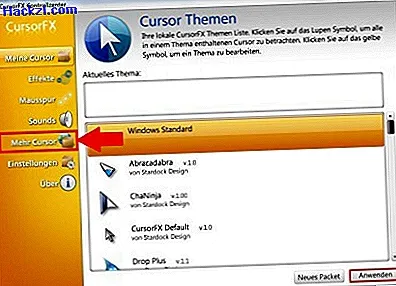
Naudodami nemokamą „CursorFX“ įrankį, galite lengvai atsisiųsti naujus pelės žymeklius ir juos tiesiogiai suaktyvinti programoje.
- Įdiekite „CursorFX“ programą ir paleiskite ją įdiegę.
- Pelės žymikliai, kurie jau yra įdiegti, rodomi skiltyje „Mano žymekliai“. Spustelėję „Daugiau žymeklių“, galite atsisiųsti įdomesnių pelės žymiklių iš kūrėjo puslapio.
- Spustelėję „Taikyti“, pakeisite pelės žymiklį.
Perskaitykite čia, kaip pakeisti darbalaukio foną.